Cart recoveryPro
Cart recovery lets the assistant start the conversation with shoppers who are about to leave, and offer a controlled discount to the ones who hesitate on price.
Cart recovery is a Pro feature and needs WooCommerce. You’ll find it under AI Assistant → Automations → Cart Recovery, in three tabs: Triggers, Smart Discounts and Analytics. The two halves are independent: triggers open the chat on their own, and the Smart Discount Engine can offer coupons in any conversation, even with triggers switched off.
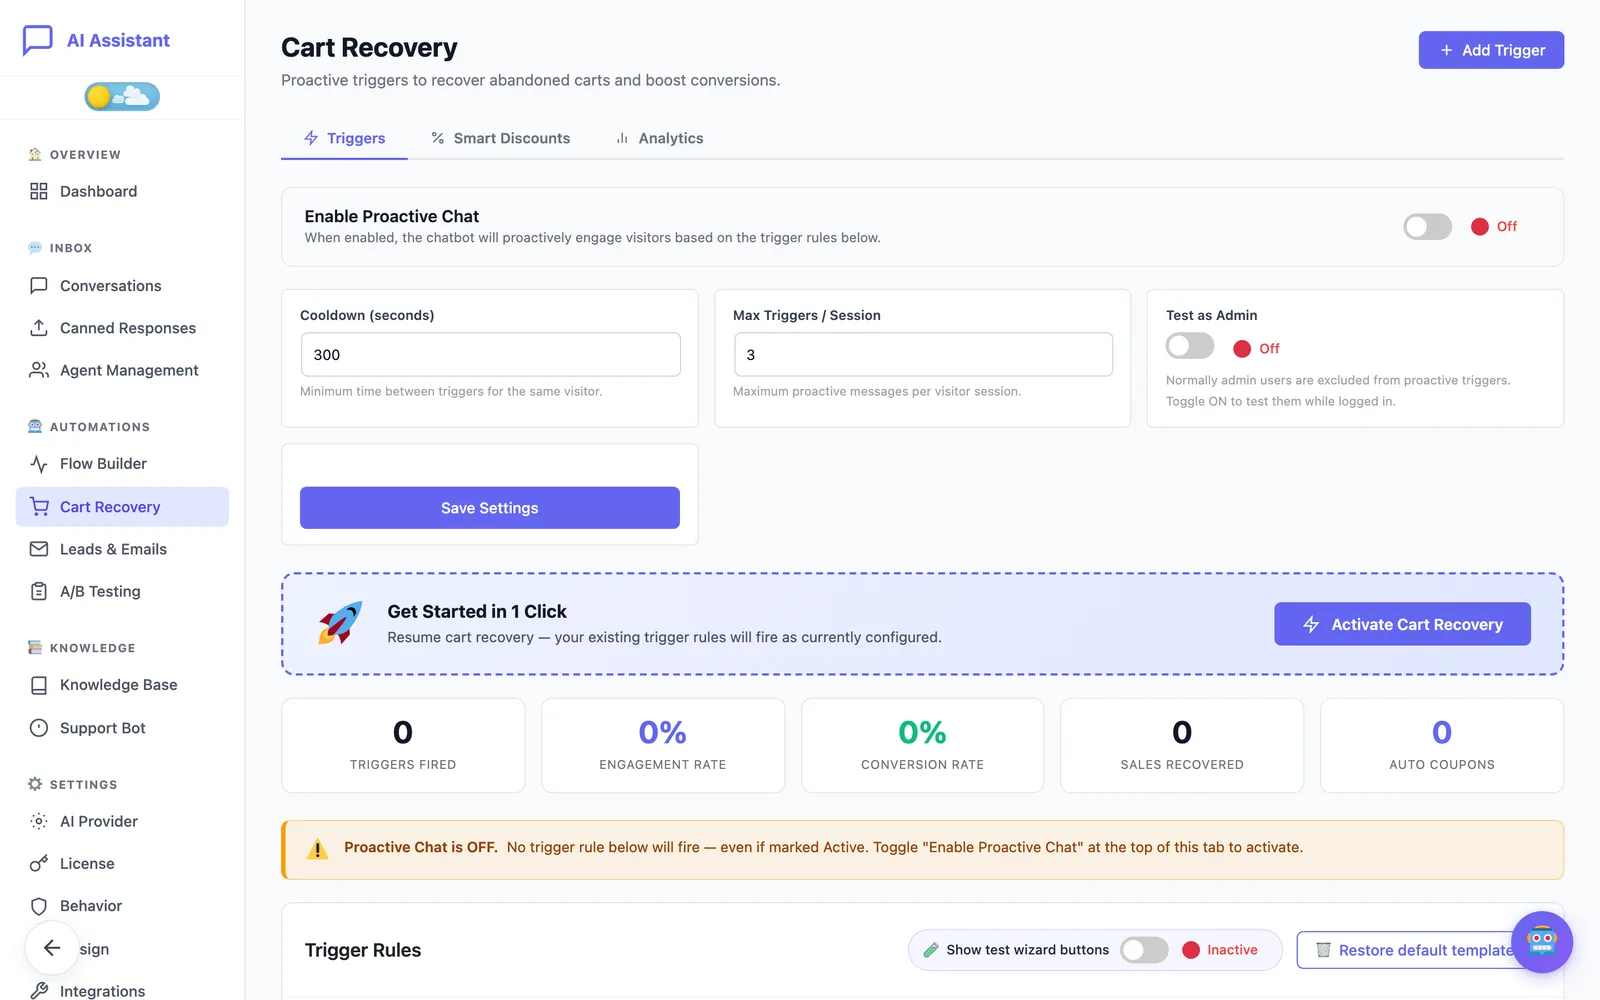
Switch it on in one click
- Open the Triggers tab.
- In Get Started in 1 Click, click Enable Cart Recovery and confirm.
This installs four ready-made trigger rules (Exit Saver, Cart Nudge, Browse Helper and Checkout Helper) and turns on Enable Proactive Chat. You can edit, disable or delete any of them afterwards.
Enable Proactive Chat is the master switch. While it is off, no trigger fires, even one marked Active.
Understand the trigger types
- Exit Intent: fires when the visitor moves the mouse quickly towards the top of the browser, as if to close the tab. It fires once per session and does not fire on mobile, where there is no mouse.
- Idle Time: fires when the visitor has not clicked, scrolled or moved the mouse for the number of seconds you set.
- Cart Idle: fires when there is at least one item in the cart and the visitor has neither changed it nor checked out for the time you set.
- Time on Page: fires after the visitor has spent a set time on a matching page type.
Create or edit a trigger
- Click Add Trigger, or open an existing rule to edit it.
- Give it a Trigger Name and choose the Trigger Type.
- Set the Priority. When several rules match, the higher priority is checked first.
- Fill in the conditions: Idle Seconds, Min Cart Value (0 means any cart), Min Time on Page, and the Page Types it applies to (Product, Cart, Checkout, Other).
- Write the Message Template. You can insert
{product},{cart_total},{cart_items},{cart_first_item},{cart_count},{cart_count_other},{discount}and{bot_name}. - Optionally enter a Discount Code: an existing WooCommerce coupon to include, shown where you put
{discount}in the message. - Click Save Trigger.
Keep it polite
Two settings at the top of the tab stop the chat from nagging:
- Cooldown (seconds): the minimum time between two triggers for the same visitor.
- Max Triggers / Session: the most proactive messages one visitor can receive in a session.
Test a trigger
- Check that the rule is Active and that Enable Proactive Chat is on.
- Open your store in a new private window. Administrators are excluded from triggers unless you turn on Test as Admin.
- Reproduce the condition: add a product to the cart and wait, or move the mouse up to the tab bar.
Turning on Show test wizard buttons adds a guided test to each rule that walks you through these steps.
Set up the Smart Discount Engine
The Smart Discount Engine lets the assistant offer a coupon when a customer hesitates on price in the chat, for example by writing “this is too expensive”. It creates a real, single-use WooCommerce coupon for that customer and shows it as an offer card with Copy Code and Apply Now buttons. The assistant is instructed never to make up a code of its own.
- Open the Smart Discounts tab and turn the engine on.
- Configure the three Discount Tiers. Level 1 is the first offer, Level 2 follows if the customer still hesitates, and Level 3 is the final offer. For each, choose a Discount Type (Free Shipping, Percentage Off or Fixed Amount Off) and an Amount.
- Optionally set a Display Label: the exact wording the assistant quotes. Keep it consistent with the amount.
- Fill in the Global Settings described below.
- Click Save Discount Settings.
If a level uses Free Shipping, your WooCommerce shipping zone needs a Free Shipping method with “Free shipping requires” set to “A valid free shipping coupon”. The screen links to the right WooCommerce setting.
The cap and the other limits
The Global Settings apply to all three levels and decide how far the assistant can go:
- Max Discount %: the hard ceiling. No level can exceed it. If Level 3 is set to 30% and the cap is 20%, the customer gets 20%, so set your levels at or below the cap to avoid a mismatch between what is said and what is applied.
- Min Cart Value: no discount is offered below this cart total. 0 means any cart.
- Min Interval (seconds): the minimum time between two offers in the same conversation. The default is 60 seconds.
- Coupon Expiry (hours): how long a generated coupon stays valid.
Level 3 is always the last step. If the customer keeps asking after the final offer, the assistant declines and reminds them of the offer they already have.
Avoid stacked offers
Discount Coordination Strategy controls what happens when a trigger with a coupon and the Smart Discount Engine could both make an offer:
- Single offer per session (recommended): the first offer wins. The Level 1 → 2 → 3 escalation still works inside the engine.
- Static coupons take priority over SDE: a coupon you configured on a trigger blocks later engine-generated offers.
Clean up old coupons
Generated coupons appear in WooCommerce → Coupons. With Auto-cleanup expired auto-generated coupons on, a daily task deletes the ones that expired more than the Retention window ago (30 days by default). Coupons you created yourself are never touched.
Test the discounts
Click Test SDE setup for a step-by-step walkthrough that checks the switch, the three levels, the cap and applying a coupon at checkout. In short: open a private window, add a product to the cart, open the chat and say the price is too high.
Read the results
The Analytics tab shows triggers fired, engagement and conversion rates and revenue recovered over 7 days, 30 days or all time, with a breakdown per trigger, the hours when triggers fire, the pages where they fire most and the recent generated coupons.
To be notified in another tool when a discount is offered, use the discount_offered event in Webhooks.
Still stuck?
Check the troubleshooting guide, or contact support and tell us what you tried.